
Most structurally sound doors can be refreshed without full replacement: decide between scuff-sanding and repainting, spot-stripping plus stain, or applying an interior film based on the door’s actual condition. If the finish is stable, with no rot, warping, or major structural damage, a light scuff and fresh coat is often the faster, sturdier choice. Doors with failing or contaminated finishes usually need targeted or full stripping first.
TL;DR:
- If your door has no rot, warping, or structural damage, a light scuff and new finish can often be completed in a single afternoon.
- Flaking paint or varnish on multiple panels indicates the finish must be stripped before refinishing, especially in deep contamination.
- Contaminants like nicotine, grease, or mildew require targeted cleaning beforehand to ensure proper adhesion of new coatings.
- For homes built before 1978, testing for lead paint is essential before any sanding or scraping to prevent health hazards.
- Using appropriate safety gear such as respirators, gloves, and proper ventilation is critical to protect against dust, fumes, and hazards like lead paint.
Table of Contents
- Decide if your door can be refinished in place or needs stripping
- Essential prep and safety before you touch sandpaper or paint
- How to choose between scuff-sand, spot-strip, or full stripping
- Primer and topcoat choices, application techniques, and cure times
- A low-mess alternative: architectural interior film instead of paint
- Fixes for common failures and how to keep refinished doors looking good
- Best practices for refinishing glass inserts or decorative elements
- Recommended protective gear and safety measures beyond lead paint
- Techniques for refinishing different door materials
- Environmental considerations and ventilation requirements
- Lessons from pro restorers and DIYers
- A practical alternative for homeowners who want less mess
- Sources
- FAQ
Decide if your door can be refinished in place or needs stripping
Before you touch a sander, spend ten minutes assessing the door honestly. This single step decides whether your project takes an afternoon or a weekend, and it prevents the frustration of a topcoat that fails within weeks.
Start with a structural check. Run your hand along the edges and bottom rail, looking for soft, spongy wood that signals rot, along with warping, loose joints, or chunks of missing material. Any of these point toward replacement or specialist repair rather than a cosmetic refresh.
Next, test adhesion. Press a fingernail or the edge of a plastic scraper into the existing finish across several panels, not just one spot. Paint or varnish that flakes away easily means that section needs stripping down to sound material, while a finish that holds tight is a green light for scuff-and-prime.
Look closely for contamination too. Nicotine residue, kitchen-adjacent grease near handles, or mildew in humid entryways all interfere with new coatings unless addressed first, and each calls for a different cleaning approach before anything else happens.
If your home was built before 1978, treat the door as a possible lead-paint risk and follow EPA guidance before sanding or scraping.
- Structural check: rot, warping, or loose joints mean repair or replacement, not refinishing.
- Adhesion test: flaking finish on multiple panels signals the area needs stripping.
- Contamination scan: nicotine, grease, or mildew each need targeted cleaning first.
- Lead check: pre-1978 homes should test before disturbing any painted layer.
- Decision rule: if a significant portion of the surface is failing, plan to strip; otherwise scuff-and-prime is usually faster.
Essential prep and safety before you touch sandpaper or paint
Skipping prep is the single fastest way to waste a weekend on a door that peels again in six months. A little discipline here pays off in a finish that actually lasts.
A statistic worth remembering: EPA RRP rules require containment, prohibit several high-dust or high-heat methods, and mandate cleaning verification whenever painted surfaces in pre-1978 buildings are disturbed. That single guideline shapes almost every safe decision you’ll make on an older door.
- Close windows, seal HVAC vents nearby, and lay down protective sheeting to contain dust and debris before starting any sanding or scraping.
- Degrease handle areas and greasy panels with a TSP substitute or mineral spirits, then rinse and let the surface dry fully.
- Remove hardware where practical, or mask it carefully, and tape off the surrounding frame and trim to protect finished surfaces.
- Choose wet-sanding over dry sanding when lead is a possibility, and run a HEPA vacuum alongside tack cloths to catch what sanding kicks up.
- Work in a garage or outdoors when you can, since ventilation cuts down on both dust inhalation and fume exposure from strippers or solvents.
- Collect paint chips and sanding dust, seal them in a bag for disposal, then HEPA-vacuum and wet-wipe every surface before declaring the area clean.
None of this is optional if you suspect lead paint. The EPA’s work-practice standards exist because dust from old painted surfaces carries real health risk, and the containment and cleanup steps are how professionals keep that risk contained.
How to choose between scuff-sand, spot-strip, or full stripping
Three mechanical approaches cover almost every door refinishing job, and picking the right one saves hours of unnecessary labor.
Scuff-sanding works when the existing finish passed your adhesion test. Move through grits from 120 to 240, following a progressive sanding sequence that smooths without gouging. On molded or paneled doors, use a sanding sponge or contoured pad to follow the profile instead of flattening the detail, and stop before you raise the grain by over-sanding.
Targeted spot stripping suits doors where only certain areas failed the adhesion test. A gel stripper is the right tool here: it clings to vertical surfaces, gives you working time, and lifts finish without soaking the whole door. Gel strippers and careful mechanical removal are a reliable method for localized removal, and heat guns or open-flame methods should be avoided wherever lead or heavy dust is a concern. Scrape gently, neutralize per the product label, and feather the edges into the surrounding sound finish.
Full stripping becomes necessary when multiple layers are failing, contamination runs deep, or old varnish has yellowed past saving. At that point, a professional dip-and-strip shop can often work faster and more evenly than hand-stripping at home.
- Scuff-sand: best for sound finishes, minimal tools, fastest turnaround.
- Spot-strip: best for isolated failures, moderate time and chemical handling.
- Full strip: best for widespread failure or deep contamination, often worth outsourcing.
Primer and topcoat choices, application techniques, and cure times
The primer you choose does more work than the topcoat gets credit for. A bonding primer is essential over glossy or laminate surfaces, since standard primers simply will not grip. A shellac-based primer is the right call when nicotine stains or wood tannins threaten to bleed through, and any bare wood or filled areas need their own spot-priming pass before the full coat goes on.
For topcoats, interior doors do well with waterborne alkyds or a satin latex, both of which resist yellowing and clean up easily. Exterior or entry doors facing sun and rain need more armor: urethane-alkyds or a marine-grade varnish hold up far better under that kind of exposure. This Old House recommends applying several thin varnish coats and sanding lightly between each one for superior protection on doors that see harsh weather.
Application schedule matters as much as product choice. Apply thin coats rather than one heavy one, sand lightly between coats at 220 to 320 grit, and respect the clock: most systems need 24 to 48 hours between coats and up to 7 days to reach full hardness. Rushing this step is the most common reason DIY finishes fail early.
- Back-prime the top, bottom, and edges of the door, since these are the surfaces most prone to moisture absorption and early failure.
- Roll on the topcoat for even coverage, then lay off with a brush on panels to eliminate roller stipple.
- Reserve spray application for pros with proper ventilation and containment, since overspray control is hard to manage in a home setting.
- Moving from an oil-based system to a water-based one requires an adhesion primer in between, or the new coat will lift.
Pro Tip: Keep the room at roughly 50% humidity while the finish cures. Both too-dry and too-humid conditions slow proper hardening and invite tackiness that never fully resolves.
A low-mess alternative: architectural interior film instead of paint
For homeowners who want a finished look without the sanding dust, drying time, or ventilation demands, architectural interior film offers a different route to the same result. Interior film is a stretchable, self-adhesive material applied directly over a properly prepped door surface, either by a homeowner following manufacturer instructions or by a certified installer for a factory-level finish.
The practical draw for occupied homes is obvious: there’s no sanding dust drifting through the house, no fumes to ventilate, and the door is usable again almost immediately after installation instead of waiting days for a topcoat to cure. Choosing vinyl film over painting also opens up a wider range of finishes than most homeowners would attempt with paint or stain alone, from convincing wood grains to stone and marble textures.
Various architectural film catalogs include options suitable for door makeovers, featuring wood looks, textured stone effects, and solid tones for clean, contemporary finishes.
Installation does still require a clean, smooth substrate, so any dents or peeling paint need attention first, and doors with heavy profiling or carved detail often benefit from a certified installer’s experience. Properly applied film holds up well in daily use, though exact durability depends on the surface prep and traffic level.
- No dust or fumes, which matters most in kitchens, bedrooms, or homes with young children.
- A wide range of textures and colors gives you design options paint alone rarely matches.
- Installation is fast enough that the door returns to service the same day in most cases.
Pro Tip: Request a sample swatch before committing to a full roll. Seeing the texture and color under your own hallway lighting avoids surprises once it’s on the door.
Fixes for common failures and how to keep refinished doors looking good
Most finish problems are fixable without stripping everything back to bare wood, as long as you catch them early. A run or drip can usually be sanded flat once fully cured, then spot-recoated. Brush marks respond to a light sanding pass followed by a thinner, more evenly loaded coat. Orange peel, that pebbly texture from spray or roller application, often means the product went on too thick or too fast, and thinning the next coat slightly usually solves it. Fish-eyes, small craters in the dried finish, point to a contaminant like silicone or wax on the surface that needs a thorough degreasing before you try again.
Edge swelling or a latch that no longer aligns after refinishing usually traces back to moisture absorption at an unsealed edge, which is why back-priming matters so much. A quick pass with a hand plane or fine sandpaper on the latch edge typically restores proper fit.
- Sand and recoat runs, brush marks, and orange peel locally rather than redoing the whole door.
- Degrease thoroughly before any recoat if fish-eyes appear.
- Plane or sand a swollen edge lightly if the latch no longer catches cleanly.
- Wipe doors down periodically and touch up worn spots before they spread.
A properly prepped and coated door finish can look good for years before it needs more than a light touch-up.
Best practices for refinishing glass inserts or decorative elements
Doors with glass panels or decorative molding need a slower, more deliberate hand. Mask the glass fully with painter’s tape and a rigid barrier, since even a light mist of overspray etches into some glass coatings and is nearly impossible to remove cleanly afterward. Score the paint line along the glazing putty or bead with a utility knife before sanding nearby, which keeps you from chipping brittle old glazing compound.
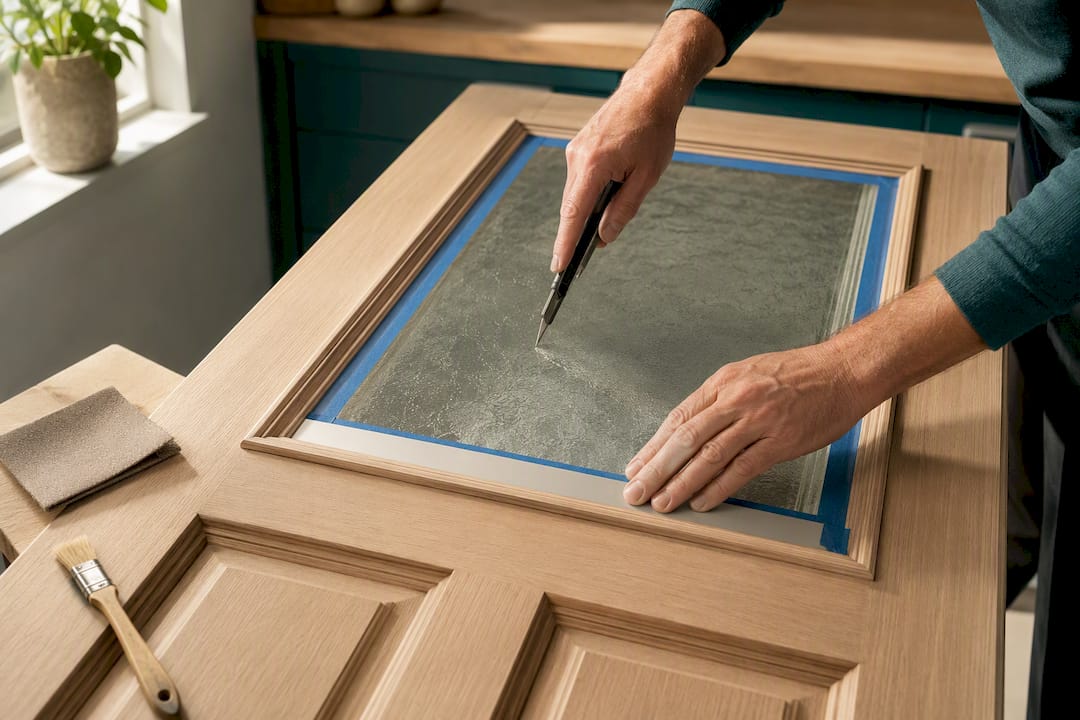
For decorative molding or applied trim, use a smaller detail sander or folded sandpaper by hand rather than forcing a random-orbit sander into tight corners, where it tends to round over crisp edges. Carved or raised details often look better with a slightly built-up finish in the recesses, so let extra coats settle there naturally rather than trying to force an even film thickness everywhere.
If the glass insert itself is original and decades old, treat it with some care: older glass can have subtle waves or bubbles that are part of its character, and a heavy-handed cleaning with abrasive pads can dull that texture permanently. A soft cloth and glass cleaner are usually all that’s needed once the surrounding frame work is done.
Recommended protective gear and safety measures beyond lead paint
Lead is not the only hazard on a refinishing project, and a few basics go a long way toward keeping the work safe. A properly rated respirator, not just a paper dust mask, matters most when using chemical strippers or sanding old finishes, since solvent vapors and fine dust both bypass a simple mask. Nitrile gloves protect your hands from strippers and solvents that dry skin out fast and can cause irritation with repeated contact.
Safety glasses matter more than people expect, particularly during scraping, since paint chips and stripper splatter travel further than you’d guess. Keep a fire extinguisher within reach whenever solvents or oil-based products are open in the workspace, and never work near an open flame or pilot light with flammable strippers in use.
Good ventilation protects you even when lead isn’t a factor, since most chemical strippers and oil-based primers off-gas compounds that cause headaches or nausea in a closed room. Fans pulling air outward, rather than just circulating it, make a real difference over a multi-hour session.
Techniques for refinishing different door materials
Solid wood doors are the most forgiving material for refinishing since they tolerate sanding, stripping, and staining well, and minor dents can often be steamed or filled before finishing. Wood veneer doors need a lighter touch: sanding through a thin veneer layer exposes the substrate underneath, so hand-sanding with a fine grit or skipping sanding entirely in favor of a bonding primer over a scuffed surface is often the safer path.
Metal doors, common on many entryways, need a different prep sequence entirely. Rust spots require a wire brush or metal-specific sandpaper before priming, and a rust-inhibiting metal primer is non-negotiable, since standard wood primers won’t bond properly or prevent corrosion from spreading underneath the new topcoat. Once primed, most exterior-grade paints formulated for metal will adhere well and hold color better than a wood-rated product would on the same surface.
Composite or fiberglass doors, increasingly common on newer builds, generally accept standard exterior primers and topcoats but benefit from a light scuff sanding first, since factory finishes on these doors tend to be quite smooth and slick, which limits paint adhesion without that extra step.
Environmental considerations and ventilation requirements
Good airflow does more than protect your lungs. It also affects how well the finish itself cures. Working in a garage with the door open, or setting up a box fan to pull air out through a window, keeps both fumes and dust moving away from you and off the wet surface, where trapped particles would otherwise settle into the finish.
Temperature and humidity both matter more than most DIYers expect. Extremely dry or humid conditions slow proper hardening, and working at roughly 40 to 60% humidity gives you the most predictable results and the fewest surprises like tackiness or slow cure times. Cold garages in winter or a muggy basement in summer are both poor environments for a lasting finish, so timing the project around milder weather, or moving the work indoors to a controlled space, pays off.
Disposing of paint chips, solvent-soaked rags, and stripper waste responsibly also matters for anyone sharing a household or a neighborhood. Sealed bags for solid waste and proper collection for liquid solvents keep contaminants out of regular trash and drainage systems.
Lessons from pro restorers and DIYers
Preparation decides almost every outcome here. Rushing the sanding step, skipping a degrease, or recoating before the last layer has cured are the mistakes behind most failed refinishing jobs, far more often than a poor product choice. Humidity and cure time deserve the same respect: a coat that looks dry to the touch at hour six may still be soft underneath at hour twelve.
Antique doors with hand-carved detail, or any door with real structural damage, are worth handing to a professional restorer rather than risking with a weekend project. Patience and the right primer for the job matter more than speed ever will.
— Bodaq
A practical alternative for homeowners who want less mess
If sanding, stripping, and multi-day cure times sound like more than your schedule allows, architectural interior film gets you a finished door without any of that downtime. Installation skips the dust and fumes entirely, and the door goes back into daily use almost right away instead of sitting propped against a wall while coats cure.

Bodaq’s Wood Collection, Metal Collection, Stone & Marble Collection, and more cover far more texture and color ground than a typical paint aisle, from realistic wood grains to stone finishes that would be difficult to replicate with a brush. You can browse the full range and request samples through the Bodaq Interior Film catalog before committing to a roll for your door project.
- No sanding dust or fumes to ventilate during installation.
- A wide range of finishes lets you match or completely reinvent your door’s look.
- The door returns to daily use quickly instead of sitting untouched during a multi-day cure.
Sources
For lead-safe work practices, consult the EPA’s RRP guidance directly. For step-by-step refinishing sequences and finish recommendations, This Old House remains a solid reference for the mechanics of sanding, priming, and coating a door properly.
- How To Refinish a Door – This Old House
- LEAD SAFE Renovation, Repair and Painting (EPA)
- Transform your door: tips for lasting paint finish
FAQ
Can I refinish my wood door without stripping it?
Yes, as long as the existing finish passes an adhesion test, meaning it doesn’t flake away easily when scraped. A light scuff-sand followed by a bonding primer and fresh topcoat works well in that case, saving significant time compared to full stripping.
Can I paint over already painted doors?
Yes, provided the current paint is adhering well and shows no widespread peeling or flaking. Clean and scuff-sand the surface first, then apply a compatible primer, especially a bonding primer if the existing paint is glossy.
What are some creative ways to update old doors?
Beyond a fresh paint color, options include staining to highlight natural wood grain, adding new hardware for a quick visual shift, or applying an architectural interior film for a wood, stone, or solid-color finish without sanding or painting at all.
Is it cheaper to paint or replace interior doors?
Refinishing an existing door with paint or stain is generally less expensive than replacement, since it avoids the cost of a new door and new hardware entirely. The exact savings depend on the door’s condition and whether professional labor is involved.
How long should I wait between coats when refinishing a door?
Most finish systems need 24 to 48 hours between coats, with up to 7 days required to reach full hardness. Rushing this timeline is one of the most common causes of early paint failure.