
Yes, architectural film installation is achievable for a careful DIYer and standard practice for a trained professional. The core method follows one sequence every time: clean and prep the surface, run an adhesion test and prime if needed, measure and cut with margin, position the panel, peel and squeegee from the center out, apply heat for curves, trim, and post-heat the edges to cure. Follow a manufacturer’s technical manual, industry cleaning standards, and formal installer training, which help ensure results hold up over time.
TL;DR:
- Proper surface cleaning and adhesion testing are crucial, especially on textured or low-energy substrates, to prevent peeling and bubble formation over time.
- Using the correct tools, like felt-edge squeegees, fresh blades, and a heat gun, along with maintaining a controlled environment, improves installation quality and durability.
- Cutting panels with extra margin and aligning pattern repeats carefully ensures seamless, clean edges with minimal visible seams.
- Applying heat evenly and gradually around curves and edges activates the adhesive and reduces future lifting or distortion.
- Experienced installers prioritize prep, consistent pressure, post-heating edges, and proper seam treatments to achieve long-lasting, professional results.
Table of Contents
- What Tools and Materials Do You Need for Architectural Film Installation?
- How Do You Prep a Surface Before Installing Architectural Film?
- How Do You Measure and Cut Architectural Film Correctly?
- How Do You Apply Architectural Film to Flat Panels and Walls?
- How Do You Heat and Stretch Architectural Film Around Curves and Edges?
- How Do You Handle Seams, Overlaps, and Pattern Matching?
- How Do You Finish and Inspect an Architectural Film Installation?
- What Are the Most Common Architectural Film Installation Mistakes?
- Why Does Installer Training and Certification Matter?
- What Do Experienced Installers Do Differently?
- Get Started with Bodaq Film and Training
- Sources
What Tools and Materials Do You Need for Architectural Film Installation?
Half of a clean architectural film installation happens before the film ever touches the wall. Show up with the wrong squeegee or a dull blade, and even a perfect substrate won’t save the job. Build your kit once, and you’ll reuse it on every project after this one.
Core tools:
- Felt-edge squeegee (avoids scratching decorative textures)
- Heat gun with adjustable temperature control
- Fresh utility blades or a snap-blade knife (swap blades often, not just when they feel dull)
- Tape measure and a metal straightedge
- Low-tack masking tape for hinging panels in place
- Microfiber or lint-free cloths
- A clean cutting mat or a dedicated cutting surface to protect floors and furniture
Consumables worth stocking before you start:
- 70% or higher isopropyl alcohol for degreasing
- A slip solution, if you’re using a wet application method on large flat panels
- Primer rated for low-energy or porous surfaces
- Silicone or MS polymer sealant for edges in bathrooms, kitchens, or other humid zones
Workspace conditions matter as much as the tool list. Aim for a room at a moderate temperature suitable for film application, out of direct sun, with low dust and low humidity. Wear nitrile gloves when handling primers or sealants, keep the room ventilated when using isopropyl alcohol or adhesive promoters, and use eye protection when trimming overhead panels. A detailed tools and equipment list is worth reviewing before your first order. Missing one item mid-install almost always means a rushed, weaker seam.
How Do You Prep a Surface Before Installing Architectural Film?
Surface prep is where most installation failures actually start, not where they show up. A bubble that appears three weeks after application usually traces back to a spot of grease or dust the installer missed on day one. Manufacturer guidance consistently points to surface cleaning, adhesion testing, and environmental control as the three variables that separate a durable install from a callback.
The cleaning and prep sequence:
- Wipe the surface with 70%+ isopropyl alcohol using lint-free cloths, working in overlapping strokes rather than circles, which tend to redeposit residue at the edges of each pass.
- Inspect for pinholes, old adhesive, chipped paint, or uneven texture. Sand rough spots, fill gouges, and let fillers cure fully before moving on.
- Let the surface dry completely. Isopropyl evaporates fast, but humid rooms slow it down more than people expect.
- Run a small adhesion test on an inconspicuous section using a peel test or a Dyne pen, which measures the surface energy a film needs to bond properly.
- If adhesion is weak, apply a primer designed for low-energy or porous substrates, then retest before committing to the full panel.
Primer isn’t optional on painted drywall with a flat, low-sheen finish, on raw MDF, or on any substrate with visible texture that could trap air. Manufacturer manuals treat this as a core success factor, alongside controlled ambient temperature and humidity during application. Skipping the test and guessing at compatibility is the single most avoidable cause of early peeling.
Pro Tip: Keep a small stash of pre-cut test squares in your kit. Running a two-minute adhesion check on scrap film before you touch the real panel costs you nothing and can save an entire roll.
How Do You Measure and Cut Architectural Film Correctly?
Cutting film too small is the mistake you can’t fix after the fact. Cutting it generously and trimming down afterward is what separates a clean edge from a visible seam gap. Measure every panel twice before the blade ever touches the material.
Measuring and layout rules:
- Add extra margin on every side beyond the panel’s finished dimensions to allow for trimming, and go wider on curved or irregular substrates where positioning shifts during application.
- Note the film’s roll direction and pattern repeat before cutting, especially on textures like stone or wood grain that need to flow continuously across a wall or panel run.
- Plan seam placement to land in low-visibility zones: inside corners, behind trim, or along natural break lines in the substrate.
- On multi-panel walls, dry-fit or dry-lay the cut pieces first to confirm the pattern lines up before committing adhesive to the surface.
- Swap in a fresh blade for every few cuts. A blade dragging through film distorts the edge and telegraphs into a ragged seam later.
- If you’re working with printed or digitally patterned film, note any plotter alignment marks and cut just outside them, never on the line itself.
A complementary read worth checking if your project includes glass doors or sidelights: film behaves differently on glazing than on wood or drywall, and layout margins often need to shrink to account for hardware clearance.
How Do You Apply Architectural Film to Flat Panels and Walls?
This is the stage where technique matters more than speed. Rushing the peel-and-apply sequence is how installers end up with trapped air pockets that no amount of squeegee pressure can push out later. The method below works for walls, cabinet faces, doors, and most large flat panels.
1. Hinge the panel in place.
Position the cut panel against the surface and secure the top edge with a strip of low-tack masking tape, creating a hinge. This lets you fold the film back without losing your alignment, which matters most on large or patterned panels where re-centering by eye almost never works twice.
2. Peel back a small section of backing.
Fold the film up on its hinge and peel away 6 to 12 inches of the adhesive backing, starting from the top. Resist peeling the entire backing off at once. On anything larger than a cabinet door, a fully exposed adhesive sheet fights you and picks up dust before it ever touches the wall.
3. Squeegee from the center outward.
Lay the exposed section down and work a felt-edge squeegee from the center of the panel toward each edge, using overlapping strokes angled around 45 degrees. This pushes air and any trapped moisture out toward the perimeter instead of sealing it in the middle. Industry step-by-step guides converge on this same center-out technique as the fastest reliable way to avoid folds on large panels.
4. Work in sections, not the whole panel at once.
Peel another 6 to 12 inches, squeegee it down, and repeat down the length of the panel. Trying to lay a full sheet in one motion is how folds happen, especially on panels taller than about four feet where gravity starts pulling the unsupported film out of alignment.
5. Apply firm, even pressure.
Light pressure leaves microscopic air gaps that show up as a dull haze or soft bubbling within days. Firm, consistent squeegee pressure bonds the adhesive properly on the first pass, which means less rework later.
6. Trim only after full placement.
Once the entire panel is down and smoothed, trim the excess margin with a fresh blade against a straightedge. Cutting flush before the whole panel is applied risks leaving you short if the layout shifts even slightly during application.
7. Do a first-pass inspection.
Run your hand flat across the surface, checking for raised edges, small bubbles, or soft spots. Catching these within the first hour, while the adhesive is still workable, is far easier than fixing them after full cure.
Pro Tip: Work top to bottom on vertical panels. Gravity is not your friend if you start at the bottom and let unsupported film sag while you work your way up.
How Do You Heat and Stretch Architectural Film Around Curves and Edges?
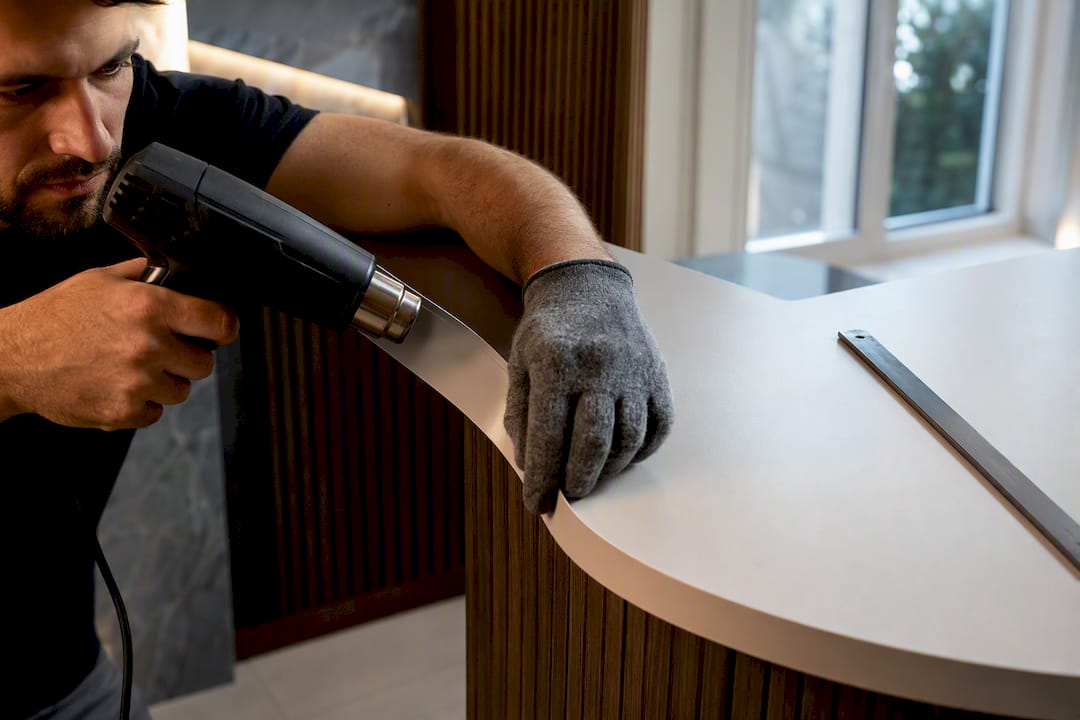
Heat is the tool that turns a flat sheet of film into a wrap that conforms to curves, rounded edges, and recessed panel details. Used carelessly, it’s also the fastest way to warp a texture or scorch a finish. The difference comes down to distance, motion, and knowing which films can take it.
Heat application basics:
- Keep the heat gun moving constantly in slow, sweeping passes rather than holding it in one spot, which concentrates heat and can distort or discolor the film.
- Work at a moderate distance from the surface, warming the film just enough to make it pliable, not hot enough to blister it.
- Stretch gradually as you heat, checking the texture pattern doesn’t distort visibly as the film conforms to the curve.
- Not every film is built for this. Some textured finishes and certain film constructions are not designed for thermo-stretching, and manufacturer technical manuals flag specific materials where stretching risks cracking the surface or thinning the pattern unevenly. Check the product data sheet before attempting a stretch on an unfamiliar film.
- After the panel is fully positioned, post-heat all edges to reactivate the adhesive and lock the perimeter down.
That last step gets skipped constantly by first-timers, and it’s the one with the most payoff. Post-heating edges after full application measurably reduces lifting over time, especially in high-traffic areas or rooms with fluctuating humidity. It’s a thirty-second pass with the heat gun that prevents a callback six months down the line.
Pro Tip: If a curved edge keeps springing back after you release it, the film wasn’t heated long enough to relax. Reheat that section for a few extra seconds and hold light pressure while it cools instead of forcing more stretch.
How Do You Handle Seams, Overlaps, and Pattern Matching?
Seams are where a good installation announces itself as good, or gives itself away as rushed. The choice between overlapping two panels or butting them edge to edge depends on the film texture, the substrate, and how visible that seam line will be once furniture and lighting are back in place.
Seam guidelines worth following:
- For overlapping textured films, keep the overlap narrow, generally no more than a quarter inch, and apply a compatible primer along the overlap zone to help the top layer bond over the base film’s finish.
- Butt joints work best on smooth, low-texture films and patterns without a strong directional grain, since even a hairline gap disappears more easily on a flat finish than on a raised texture.
- Pre-warm the seam area lightly after joining panels. This relaxes minor shrinkage that can otherwise open a visible gap days after installation.
- In bathrooms, kitchens, or other high-moisture zones, seal seam edges with silicone or an MS polymer sealant rather than leaving raw film edges exposed to standing water.
- Avoid placing seams directly over the busiest part of a pattern repeat. Even a well-matched seam draws the eye when it falls at a focal point.
Common seam traps include forcing an overlap on film not designed for it, and rushing to a butt joint on a heavily textured product where the raised grain makes any gap obvious under angled light.
How Do You Finish and Inspect an Architectural Film Installation?
The final trim pass and post-install check are what separate an amateur job from one that looks intentional. Take your time here. It’s a small percentage of total install time but most of the visible quality.
Finishing checklist:
- Trim with a fresh blade held at a consistent angle, easing into tight inside corners rather than forcing the blade through in one motion.
- Relieve tension around curves and corners by making small relief cuts before trimming flush, which prevents the film from tearing back once released.
- Run a full-surface inspection checking for bubbles, edge lift, and soft spots where pressure wasn’t applied evenly.
- Give the adhesive real cure time. Avoid cleaning, heavy contact, or moisture exposure on the surface for the first 24 to 48 hours.
- During the first week, clean only with a soft microfiber cloth and mild soap and water. Skip ammonia-based or abrasive cleaners, which can degrade the adhesive bond before it’s fully set.
A dedicated maintenance guide covers longer-term cleaning products and methods once the installation has fully cured.
What Are the Most Common Architectural Film Installation Mistakes?
Most film failures trace back to one of a handful of repeat offenders, and nearly all of them are fixable if you catch them early.
- Bubbles appearing within hours: usually trapped air from rushing the squeegee pass. Small bubbles can often be popped with a pin and pressed flat; larger ones need the section lifted, re-cleaned, and reapplied.
- Peeling at edges after a few days: almost always surface contamination missed during prep, or a missing primer on a low-energy substrate. Clean guidance is consistent on this point: skipped cleaning is the leading cause of early bubbling and peeling. Re-clean the substrate, prime it, and reapply.
- Hazy or dull patches: often uneven squeegee pressure during the initial pass. A reheat and firm re-squeegee sometimes resolves it; if the adhesive has already set poorly, the panel needs replacing.
- Lifted seams months later: typically a skipped post-heat step. Reheat the seam and press firmly while it cools.
If a panel needs full removal, warm the adhesive gently before peeling to avoid tearing the substrate finish, and wear gloves when handling adhesive residue. Large-format walls, curved architectural elements, or any job where the substrate itself is questionable are good candidates for a certified installer rather than a solo attempt.
Pro Tip: Keep a small offcut of every film you install, labeled with the room and date. When a repair comes up two years later, you’ll have an exact texture and dye lot match on hand instead of guessing.
Why Does Installer Training and Certification Matter?
Quality training programs cover more than the basic peel-and-stick sequence. A solid course walks installers through reading a product data sheet, running adhesion tests correctly, choosing the right primer for a given substrate, and recognizing which films tolerate thermo-stretching and which don’t. That knowledge is what shortens rework on the job site, since a trained installer catches a compatibility problem in the five-minute test phase instead of three weeks after handoff.
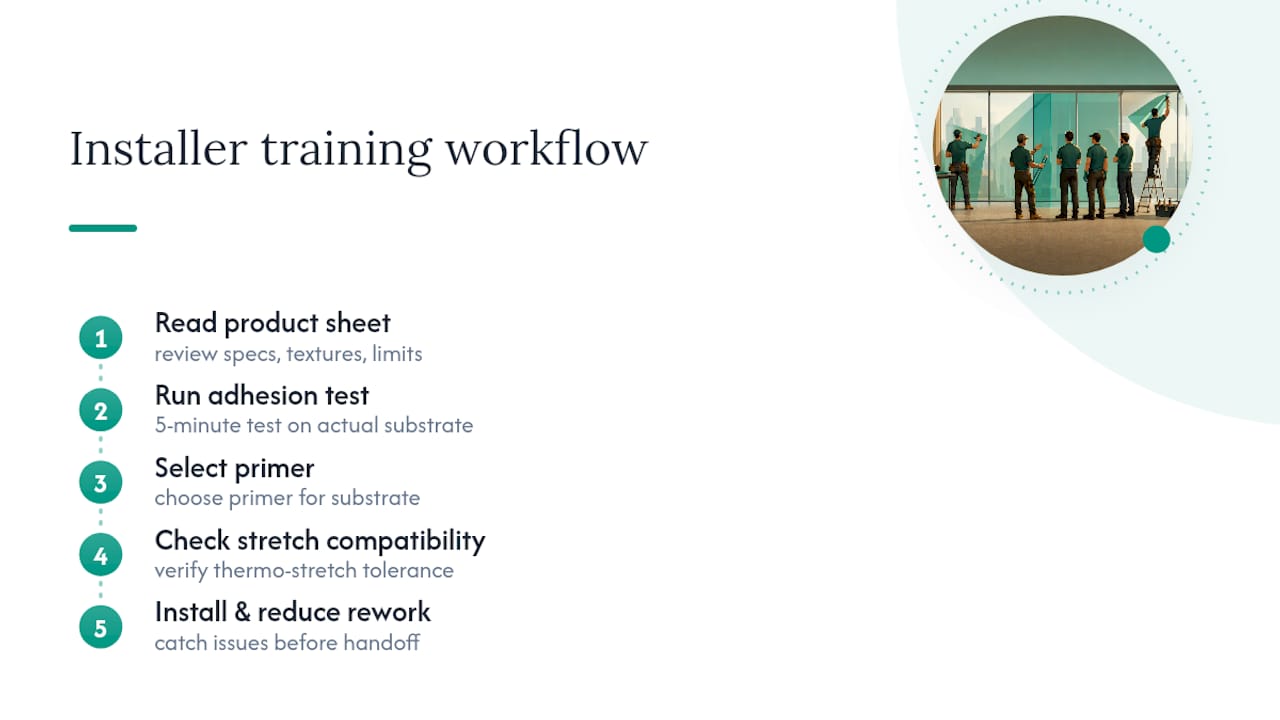
Bodaq runs a structured training program with hands-on practice and certification, backed by webinars that walk through technique updates as new textures and finishes come online. The film itself is built to make the learning curve shorter: it’s stretchable and self-adhesive, which means less specialized equipment and fewer surprises than older wrapping methods demand. Combined with a catalog of finish and texture properties, the product and the training are designed to work together rather than as separate concerns.
If you’re weighing DIY against hiring a certified installer, requesting a sample panel first is worth the small delay. It lets you test adhesion on your actual substrate and get a feel for the film’s stretch behavior before committing to a full room.
What Do Experienced Installers Do Differently?
The gap between a mediocre install and a genuinely clean one rarely comes down to talent. It comes down to a handful of unglamorous habits that experienced installers treat as non-negotiable and beginners skip when they’re in a hurry.
Prep time allocation is the biggest one. Installers who spend real time cleaning and testing adhesion before cutting a single panel almost never deal with mid-job surprises. The ones who rush prep to “get to the fun part” are the ones calling back three weeks later asking why an edge is lifting. Blade replacement is the second habit that separates clean work from ragged work: swapping blades every few cuts feels wasteful until you compare a fresh-blade edge to a dull-blade edge side by side. Post-heat discipline is the third. It takes thirty extra seconds per panel and it’s the step most often abandoned when a job runs long.
As for DIY versus professional installation, the honest answer depends on scope. A single accent wall, a cabinet refresh, or a small furniture piece is well within reach for a patient DIYer willing to run a proper adhesion test first. A full commercial buildout, curved architectural elements, or anything involving specialty substrates is where formal training or a certified installer earns its cost back in avoided rework.
— Bodaq
Get Started with Bodaq Film and Training
A self-adhesive, stretchable film cuts real time off an install by skipping extra adhesive promoters and heavy equipment that older wrapping systems require, while still holding up to daily wear in busy commercial and residential spaces. That combination of easier handling and a large catalog of textures means fewer wasted panels and less guesswork on pattern matching.
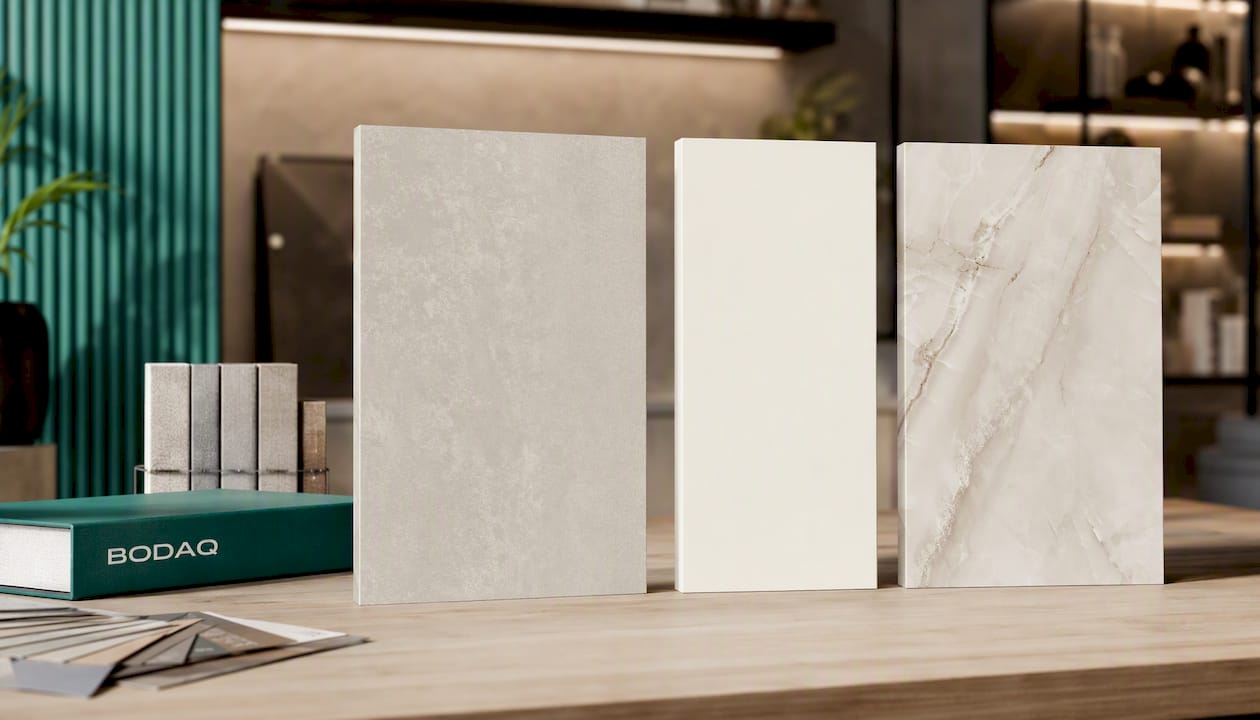
If your project calls for a natural stone look without the weight or cost of real stone, the Rustic Stone finish handles high-touch surfaces without showing every fingerprint. For hospitality projects, healthcare facilities, or any space where hygiene and easy upkeep matter more than pattern, the Easy Clean film is built specifically for that demand. And for a deep, high-durability finish suited to exterior-facing or heavy-use applications, the Onyx finish delivers a bold, dark texture that holds its finish under repeated contact.
Request a sample of any of these three finishes to test adhesion on your own substrate before committing to a full room, or enroll in the Bodaq certification program if you’re installing at scale and want the rework-reducing technique built in from day one.
Sources
For installers who want the full technical detail behind the steps above, the Antalis technical installation manual covers adhesion testing procedures, primer selection by substrate type, and storage and handling conditions in more depth than any single article can. The TeckWrapCraft step-by-step application guide is a solid practical reference for the hinge-and-squeegee technique and post-heat timing. For anyone troubleshooting bubbling or peeling on an existing install, Ceramic Pro’s guidance on surface cleaning explains the contamination issue in more technical detail than most film manufacturers publish.
- Application guidelines and technical manual for interior film (Antalis technical manual)
- How to Apply Interior Films: A Complete Step-by-Step Guide – TeckWrapCraft
- How to prevent window tint from bubbling or peeling | Ceramic Pro