
Most small lifts, curled edges, and short tears in a vinyl door wrap are repairable with careful cleaning, the right adhesive, and a gentle heat tool. Shrinkage or widespread delamination almost never holds up to a patch, so a full rewrap or replacement becomes the durable fix. If your damage is small and localized, try a DIY repair first; if it has spread across the panel, plan for a professional rewrap instead.
TL;DR:
- A small, localized lift is repairable when the film remains flexible, its pattern aligns, and the surface beneath it is clean and dry.
- Clean with isopropyl alcohol, let the surface dry fully, and use architectural film adhesive; household glue can fail within a season and leave residue.
- Test a small adhesive patch after about ten minutes, then again after 48 hours in humid conditions, and keep repairs dry throughout curing.
- A professional rewrap typically costs $150 to $600, depending on door size and film choice, and takes under a couple of hours per door.
Table of Contents
- How to assess damage: what makes a wrap repairable
- Step-by-step DIY repairs for lifting edges and small tears
- Tools, adhesives, and what professionals warn against
- When repair isn’t a durable option: rewrap or replace
- Professional perspective: how certified installers approach repairs and rewraps
- Preparation and cleaning steps before attempting repair
- Impact of environmental factors on repairability and longevity
- Tips for preventing common damage types to door wraps
- Compatibility of Bodaq Interior Film with repair materials and adhesives
- Detailed troubleshooting for common repair issues
- Pragmatic decision guide for homeowners
- Bodaq rewrap options and next steps
- FAQ
- Sources
How to assess damage: what makes a wrap repairable
Before reaching for any tool, take a close look at what you’re dealing with. A repairable wrap usually shows a small, localized lift at a seam or corner, a substrate underneath that’s clean and dry, and film that’s still flexible enough to lie flat once reheated. If the pattern or grain still lines up where the film has lifted, that’s a good sign the material hasn’t shifted or stretched out of shape.
Non-repairable damage looks different. Film that has shrunk pulls away from edges evenly and will not stretch back into position no matter how much heat you apply, a point confirmed by trade guidance on common wrap failures. Large tears, adhesive failure spread across an entire panel, and contamination trapped under the film (oil, dust, moisture) also push a job out of DIY territory, since adhesive simply will not bond to a dirty surface underneath.
A few quick tests tell you which category you’re in:
- Visual inspection: run your fingers along the lifted edge and check whether the film underneath looks clean or discolored.
- Gentle heat test: warm the area with a low-temperature heat gun and watch whether the film relaxes and lies flat or stays rigid and resistant.
- Small adhesion spot test: press a small section down after applying adhesive and check if it holds after a short wait.
If the film relaxes and the surface underneath is clean, you’re likely looking at a repair job. If it stays stiff or the edges keep lifting back up, you’re looking at a rewrap.
Step-by-step DIY repairs for lifting edges and small tears
Once you’ve confirmed the damage is small and localized, set up a clean, dry workspace away from drafts or direct sun, which can affect how the film and adhesive behave. Gather your tools before you start: a low-temperature heat gun, a microfiber cloth, isopropyl alcohol, a fine plastic scraper, a thin adhesive applicator or injector, and small clamps or a soft roller.
- Clean the area. Wipe down the lifted section and surrounding surface with isopropyl alcohol to remove oils, dust, and residue.
- Dry completely. Let the surface air dry for several minutes; trapped moisture is one of the most common reasons repairs fail.
- Test the adhesive. Apply a small amount to an inconspicuous spot first and check for discoloration or poor bonding.
- Warm the film gently. Use the heat gun on a low setting to relax the vinyl so it flexes without stretching or scorching.
- Lift and apply adhesive. Carefully peel back the lifted edge just enough to inject or spread a thin, even layer underneath.
- Press and hold. Smooth the film down with a roller or clamp, working from the center of the repair outward to push out air.
- Trim and finish. Clean away any excess adhesive and check the edge for a tight, seamless line once cured.
For small tears, a discreet patch often works better than trying to stretch the original piece back together. Cut the patch slightly larger than the tear, and take time to align the grain or pattern direction so the seam blends in rather than standing out against the surrounding surface.
Pro Tip: Press from the center outward in overlapping passes rather than pushing straight down in one spot. This keeps air from getting trapped under the film and protects the finish from scuffing under the roller.
Tools, adhesives, and what professionals warn against
The right tools make the difference between a repair that lasts and one that lifts again within weeks. Reach for:
- Industry-grade contact adhesives formulated specifically for interior film, not general-purpose household glue.
- Temperature-controlled heat guns that relax vinyl evenly without scorching it.
- Soft rollers and squeegees to press film down without creasing or stretching it.
Common consumer adhesives are a frequent source of failed repairs. Practitioners note that household glues aren’t formulated for the heat cycles interior film goes through daily, and they often fail within a season, leaving behind a residue that complicates or blocks any later professional repair, according to practitioner guidance on repairing vinyl surfaces. Skipping straight to whatever adhesive is in the junk drawer tends to cost more time later than it saves now.
Before committing to a full repair, professionals run a short adhesion test, pressing a small patch down and checking it again after about ten minutes, then sometimes rechecking after 48 hours to confirm the bond holds up against ambient moisture. Our 48 hour adhesion test guidance walks through why that longer moisture check matters before calling a repair finished.
When repair isn’t a durable option: rewrap or replace
Shrinkage and widespread delamination are poor candidates for a patch repair because the film has already pulled away from its original shape. Once film shrinks, trade sources confirm it generally cannot be stretched back into reliable alignment, which means any patch applied over it is likely to lift again soon, per common wrap failure analysis.
A small DIY patch costs little beyond the price of adhesive and a few tools you may already own. A professional rewrap typically has variable costs depending on door size and film choice, with installation being relatively quick. A professional rewrap delivers a seam-free finish, consistent pattern matching across the whole door, and longevity that a patch can’t match, since the entire surface gets fresh film and fresh adhesive rather than a repair layered on top of aging material.
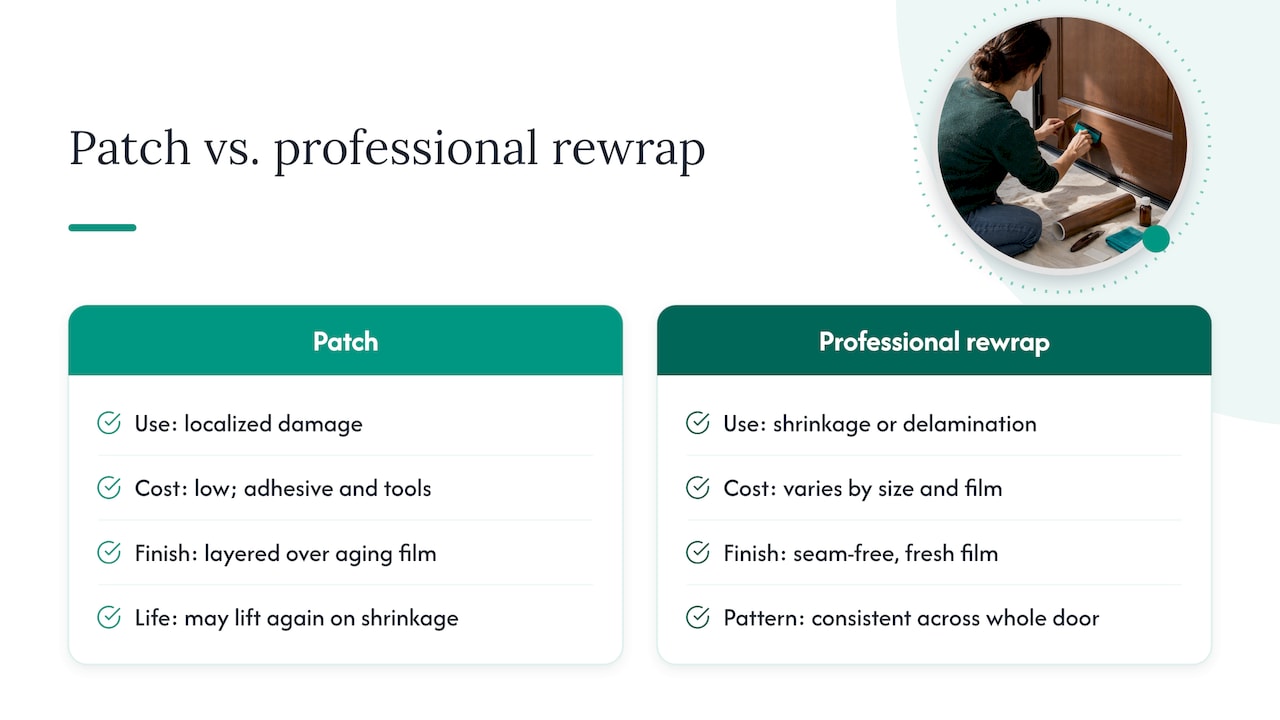
If replacing the door itself is on the table rather than refinishing it, it’s worth weighing that against a rewrap too. Guidance on replacing versus refinishing interior doors lays out when a full swap makes more sense than resurfacing, which is useful context if your doors have structural issues beyond the wrap itself. For cosmetic wear and film damage alone, a rewrap using a collection like Smoked Charcoal Oak or Natural Oak restores a seamless look without replacing the door.
Professional perspective: how certified installers approach repairs and rewraps
Certified installers treat every repair decision as a moisture and adhesion question first. Before touching a damaged panel, they run short adhesion checks and, where humidity is a concern, a longer moisture test to confirm a bond will hold before committing tools and adhesive to the job. Curved or paneled doors get special attention, since matching geometry correctly is what keeps a wrap looking seamless rather than patchworked.
Our stretchable, self-adhesive film is designed to install cleanly with standard primer and installer tools, and professional installation can be done efficiently. That speed, paired with typical costs for a full rewrap, is why many installers steer homeowners toward a rewrap once damage spreads beyond a single small spot.
| Repair type | Typical time | Rough cost |
|---|---|---|
| DIY patch | Under 1 hour | Cost of adhesive and tools on hand |
| Professional spot repair | several minutes | Lower cost than a full rewrap |
| Full professional rewrap | under a couple of hours per door | costs a few hundred dollars |
Preparation and cleaning steps before attempting repair
Every successful repair starts with a surface that’s completely dry and free of contaminants. Skipping this step is the single most common reason a patch or edge fix lifts again within days.
Start by wiping the damaged area and the surrounding surface with isopropyl alcohol on a microfiber cloth, working in straight passes rather than circles to avoid pushing debris back under the edge. Pay close attention to corners and seams, where dust and grease tend to collect over time without being obvious to the eye.
Once the surface looks clean, let it air dry fully before testing anything. Trapped moisture underneath film is invisible until you apply heat, at which point it can cause bubbling that ruins an otherwise careful repair. If the area was recently exposed to steam, cooking grease, or cleaning spray (common near kitchen cabinet doors), give it extra drying time or a second alcohol pass.
Contamination that’s worked its way under the film itself, rather than sitting on top of it, is a different problem. When dirt or oil has gotten underneath a lifted edge, adhesive has nothing clean to bond to, and no amount of surface cleaning on top will fix that, according to trade guidance on wrap failures. In that case, thorough cleaning under the lifted section itself, or replacement of that section, becomes necessary before any adhesive goes on. Our cleaning and maintenance guide covers the everyday care that keeps contamination from building up in the first place.
Impact of environmental factors on repairability and longevity
Humidity and temperature both play a role in whether a repair holds and how long a wrap lasts overall. Film that’s been through repeated heat and moisture cycles, like doors near a kitchen stove, bathroom shower, or a sun-exposed entryway, tends to show lifting and shrinkage sooner than film in a stable, climate-controlled room.
High humidity slows drying time during a repair and can trap moisture under freshly applied adhesive, which is exactly why professionals run a moisture check before calling a repair finished rather than relying on a quick visual pass. Our 48 hour adhesion test explains how that longer check accounts for ambient moisture that a same-day test might miss.
Temperature swings matter just as much. Film that expands slightly in summer heat and contracts in winter cold puts ongoing stress on seams and edges, which is often where lifting starts first. Doors in unconditioned spaces, like garages, mudrooms, or seasonal cabins, are more prone to this kind of wear and may need more frequent spot checks than interior doors in a consistently heated or cooled room.
None of this means repair is off the table in humid or temperature-variable spaces. It does mean giving a repair extra curing time, avoiding repairs during extreme heat or cold snaps, and checking back on the area after 48 hours rather than assuming a same-day fix has fully set.
Tips for preventing common damage types to door wraps
A little routine attention goes a long way toward keeping film from lifting or tearing in the first place. Most damage traces back to a handful of predictable causes, and each one is easy to head off.
Edges near handles and hinges take the most daily wear, since that’s where hands, bags, and furniture tend to brush against the door. Wiping these spots down regularly and avoiding sharp-edged cleaning tools keeps small nicks from turning into lifted corners over time.
Moisture is the next biggest factor, particularly in kitchens and bathrooms where steam and splashes are routine. Drying spills promptly and avoiding abrasive or ammonia-based cleaners protects both the film and the adhesive underneath it; our cleaning and maintenance guide covers the specific products that are safe to use.
Direct, sustained heat (a door next to a radiator or in constant afternoon sun) accelerates the kind of expansion and contraction that eventually leads to shrinkage. Where that’s unavoidable, more frequent visual checks catch early lifting before it spreads into something that needs a full rewrap.
Finally, avoid using sharp tools or abrasive pads anywhere near seams or edges during routine cleaning. A soft microfiber cloth handles daily grime without putting stress on the thin edges where film is most vulnerable to lifting.
Compatibility of Bodaq Interior Film with repair materials and adhesives
Our interior film is built to work with standard primer and installer-grade tools, which matters when you’re deciding what to use for a spot repair. The same qualities that make installation straightforward (a stretchable base and an air-channeled, self-adhesive backing) also make small repairs more forgiving than they are with rigid, non-stretch materials.
That flexibility has limits, though. A repair adhesive needs to match the heat tolerance and bonding profile of the film itself, which is why household glues and general-purpose solvents are a poor match. Those products aren’t formulated for the heat cycles film goes through, and they tend to fail within a season while leaving a residue that blocks proper bonding if a professional needs to step in later, as practitioner guidance on vinyl repairs points out.
For spot repairs on our film, stick with adhesives designed for architectural film applications and a controlled-heat tool rather than anything improvised. If you’re unsure whether a product on hand is compatible, our technical bulletins outline the specifications that installers use to match adhesives and tools to the film correctly. When in doubt, a small test patch in an inconspicuous spot, checked after ten minutes and again after 48 hours, tells you quickly whether the combination will hold.
Detailed troubleshooting for common repair issues
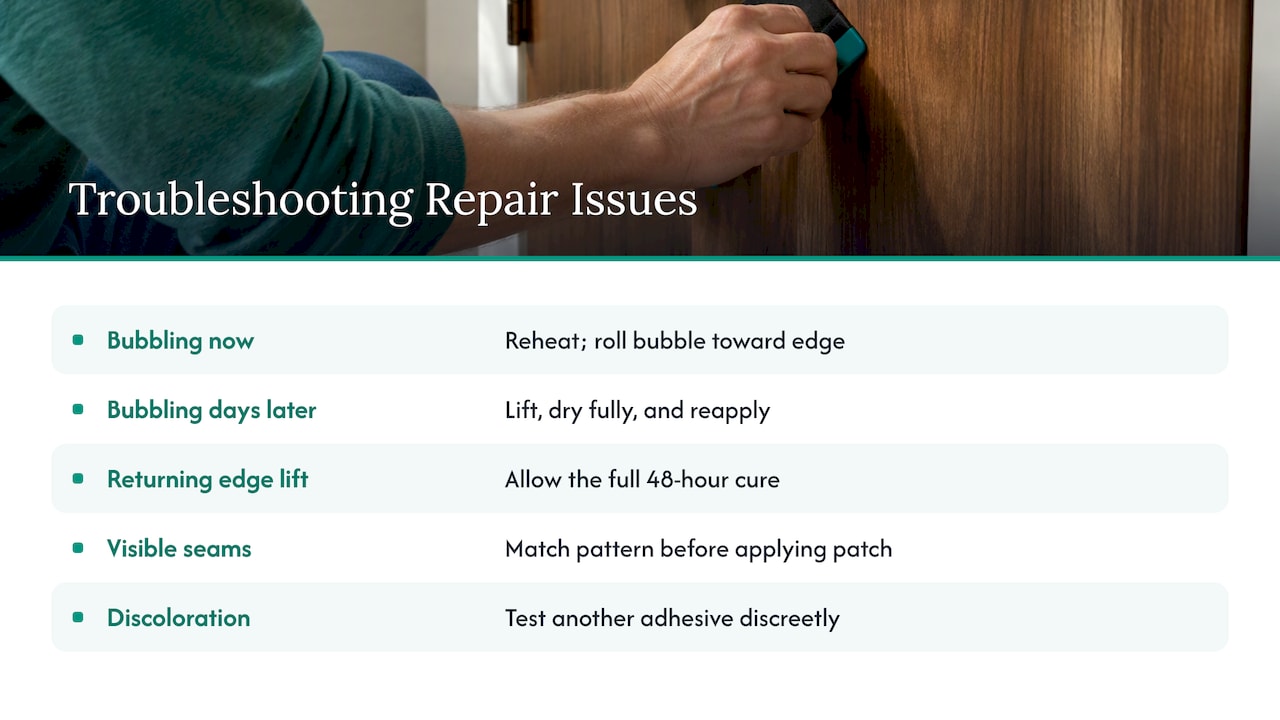
Bubbling after a repair usually points to trapped air or moisture under the film. If it shows up right after pressing the film down, reheat the spot gently and work the bubble toward the nearest edge with a soft roller rather than puncturing it, which can leave a visible mark. If bubbling appears days later, moisture trapped during the repair is the likely cause, and the area may need to be lifted, dried fully, and reapplied.
Edge lifting that returns after a repair often means the adhesive didn’t fully cure before the area was touched or exposed to moisture. Give repairs the full 48 hours to set before cleaning or handling that section, and avoid water contact near fresh repairs during that window.
Visible seams around a patch generally come down to pattern or grain misalignment. Taking the time to match direction and pattern before applying a patch, rather than after, is the difference between a repair that blends in and one that draws the eye.
Discoloration around a repaired area can signal an incompatible adhesive reacting with the film or substrate underneath. If this happens, stop and test a different adhesive in an inconspicuous spot rather than continuing with the same product on the visible repair.
If a repair fails more than once in the same spot, that’s usually a sign the damage has progressed past what a patch can reliably fix, and a rewrap of that panel is the more durable path forward.
Pragmatic decision guide for homeowners
Weigh four things before you pick up a tool: how big the damage is, how visible the door is day to day, how much traffic that door sees, and how long you want the fix to last. Small, out-of-sight damage is worth a DIY attempt. Visible doors, high-traffic entries, or anything already showing shrinkage are better served by a professional rewrap.
If you’re leaning toward a rewrap, requesting a sample or checking installer training in your area is a reasonable next step before booking anything.
— Bodaq
Bodaq rewrap options and next steps
When a patch won’t hold, there is a faster path back to a seamless door with installation that typically takes less than a couple of hours per door.

- Browse our wood, metal, and stone collections for a pattern that matches your existing doors.
- Request a sample or technical bulletin through our technical bulletins page before committing to a color.
- Start with our Bodaq Interior Film catalog to get a quote for your door or project.
FAQ
How long does door wrapping last?
Door wrap longevity depends heavily on exposure to heat, moisture, and daily handling, with doors in stable, climate-controlled rooms typically holding up longer than those near kitchens, bathrooms, or direct sun. Routine cleaning and prompt attention to small lifts help extend that lifespan before shrinkage or widespread delamination sets in.
How much does it cost to repair a door panel?
A small DIY patch costs little beyond basic tools and adhesive you may already have. A professional rewrap typically runs $150 to $600 depending on door size and film choice, which often ends up more cost-effective than repeated patch attempts on a door with spreading damage.
How do you repair vinyl wrap?
Clean the damaged area thoroughly with isopropyl alcohol, let it dry completely, and test your adhesive on an inconspicuous spot first. Warm the lifted edge gently with a low-temperature heat gun, apply adhesive underneath, press and hold with a roller, then trim and finish the edge once it’s cured.
Can you remove vinyl wrap from kitchen doors and paint them afterward?
Yes, vinyl film can generally be removed from kitchen doors using gentle heat to loosen the adhesive, followed by thorough cleaning of any residue before painting. The surface underneath needs to be completely clean and free of old adhesive for paint to bond properly, so this step is worth taking slowly rather than rushing.
Sources
- Q&A: Repairing vinyl flooring (practitioner warning about adhesives)
- Common wrap failures and how to avoid them