A door jamb wrap is a self-adhesive architectural film applied to the frame around an interior door: the two side jambs, the head jamb and, often, the casing. Done well, it gives a worn, mismatched or dated frame a new wood, stone, metal or solid-color finish in a fraction of the time that stripping, sanding and repainting would take. It also lets the frame match the door, the wall or the rest of a brand palette. This guide covers when a jamb wrap is a good fit, how to prep and install it, how to handle the tricky corners and edges, and what shapes the cost.
TL;DR
- Interior door frames are one of the best candidates for architectural film: flat runs, defined edges and a finish that can be matched to doors, millwork or wall treatments.
- Surface prep decides the result. The frame must be clean, dry, sound and free of loose paint or flaking before any film goes on.
- Work in a set order: head jamb, then side jambs, with relief cuts at corners and a clean, tucked edge at every reveal.
- Cost depends on the number of frames, their condition, the finish you choose and how much carpentry repair comes first, not on the film alone.
- Interior jamb wraps are a different job from a garage-door jamb guard or a car door-jamb wrap, so don’t take advice from those and apply it here.
Table of Contents
- What a door jamb wrap actually is
- Should you wrap interior door jambs?
- Which finishes suit a door frame
- What you need before you start
- Surface conditions to check
- How to wrap a door jamb step by step
- Common mistakes and how to avoid them
- Durability, cleaning and upkeep
- What affects the cost of wrapping a door frame
- Our perspective on jamb wraps
- Ready to wrap your frames?
- FAQ
- Sources
What a door jamb wrap actually is
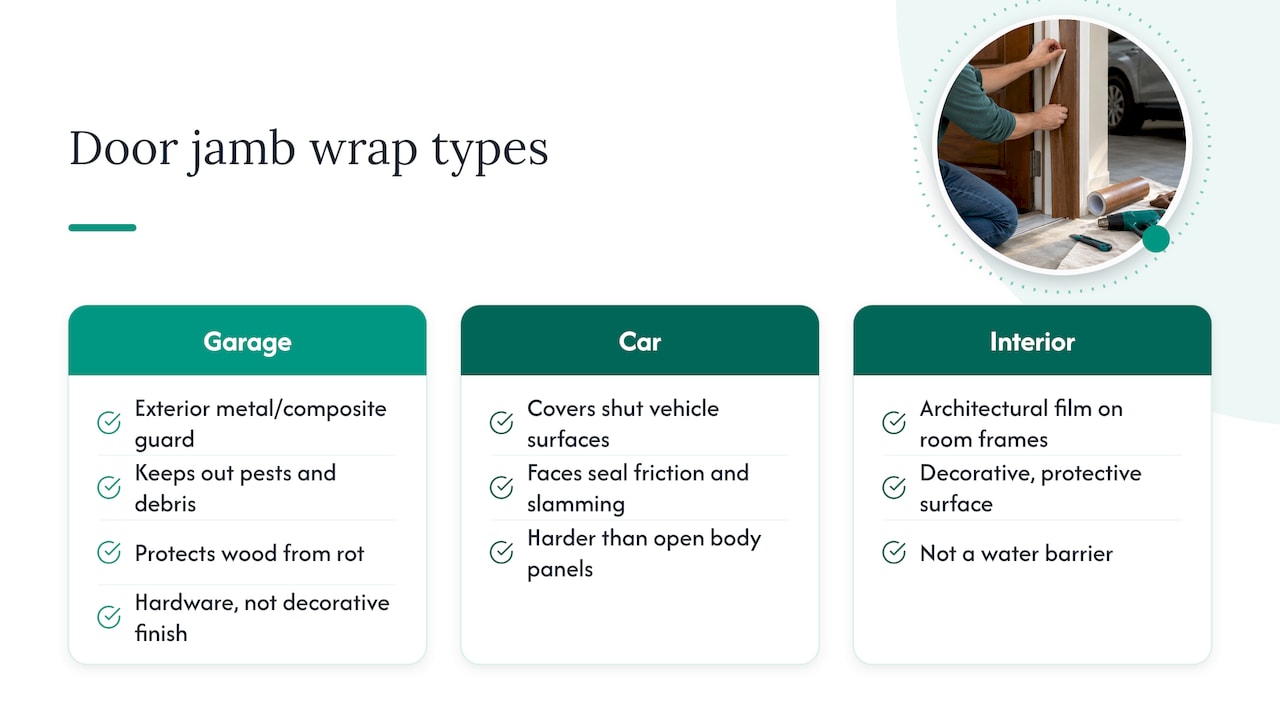
Search for this phrase and you will see three very different things. They share a name and almost nothing else.
Garage door jamb wraps are metal or composite guards fitted over the exterior wood jambs of a garage door. Their job is to keep out pests and debris and to protect the wood from rot. They are hardware, not a decorative finish.
Car door-jamb wraps cover the shut surfaces inside a vehicle’s door openings. Automotive installers point out that jambs see seal friction, slamming, hardware and foot traffic, which is why they are harder and slower than an open body panel. That advice belongs to vehicles, so one installer guide is useful only for understanding why a car jamb is a different problem.
Interior door jamb wraps, the subject here, use architectural interior film on the frame of a room or passage door. The film is a decorative, protective surface. It is not a water barrier. Exterior doors and windows rely on flashing, sill pans and water-resistive barriers to manage water, as building-code guidance on window and door flashing explains. If water is getting into a frame, fix that first. A film does not replace flashing.
If you are new to the material, our overview of what architectural film is and how to use it explains how the film is built and why it behaves differently from paint or laminate.
Should you wrap interior door jambs?
In most interior projects, yes, provided the frame is sound. Here is when it makes the most sense.
Good situations for a jamb wrap
- Doors already wrapped or being replaced. A wrapped door set in a painted frame often looks unfinished. Continuing the film onto the jamb reads as one considered piece.
- Dated or damaged stained wood. Film hides color variation, old stain and shallow marks once the surface is repaired and smooth.
- Hospitality and commercial corridors. Guest-room and office frames take knocks from luggage, carts and daily traffic. Film lets you refresh a floor of doors without shutting a space for long.
- Brand-driven interiors. Retail, clinics and offices can match a signature color or wood tone across every frame.
- Rentals and turnovers. A consistent finish across units is easier to maintain than touch-up paint that never quite matches.
When to repair first
A wrap is a finish, not a structural fix. Deal with these before you order film:
- Soft, swollen or rotted wood, which needs replacing or filling.
- Active moisture from a leak or a wet wall.
- Peeling paint layers that are not bonded to the frame.
- Deep gouges and open joints that will telegraph through the film.
For moisture-prone spaces, our 48-hour adhesion test for moisture-resistant wall finishes shows how we approach film in humid conditions, which is worth reading before wrapping frames near bathrooms or kitchens.
Which finishes suit a door frame
Frames are narrow and viewed up close, so the finish matters more than on a big wall. A few pairings that tend to work:
| Look | Where it shines | Example from the catalog |
|---|---|---|
| Warm natural oak | Homes, offices, anywhere the door is also wood | Natural Oak LW108 |
| Dark, moody wood | Statement doors, hospitality corridors | Smoked Charcoal Oak LW113 |
| Pale, driftwood tones | Light, Scandinavian-leaning interiors | Sandstorm Oak LW116 |
| Clean neutral | Modern spaces, matching painted walls | Silver Mist S263 |
| Metal | Accent frames, lobbies, elevator areas | Brass RM008 |
| Textile | Quiet, tactile rooms | Woven Linen SF803 |
Wood grain deserves one extra thought. Pick the direction of the grain before you cut: on a vertical side jamb the grain should run up and down, and on the head jamb it should run across, the way real millwork is built. Matching that logic is the difference between a frame that reads as genuine and one that looks stuck on.
What you need before you start
Gather everything so you are not hunting for a tool with film half-applied.
Materials
- Interior film in your chosen finish, with enough extra length for relief cuts and a mistake or two.
- A primer where the surface calls for one. We offer a water-based primer for preparing surfaces.
- Mild cleaner and lint-free cloths.
Tools
- A sharp knife with snap-off blades, changed often.
- A squeegee with a felt edge, plus a smaller one for narrow runs.
- A heat source for post-heating, used carefully.
- A measuring tape, straightedge and pencil.
- Masking tape for holding and positioning.
- Painter’s tape and a drop cloth to protect floors and walls.
Samples are worth ordering for any frame job. Colors and grain look different beside your actual door and under your actual lighting. Our catalog and gallery help you narrow it down first.
Surface conditions to check
Film can only be as good as what it bonds to. Run through this list on every frame.
- Clean. Remove dust, grease, hand oils and cleaning-product residue. Kitchens and service corridors are the usual culprits.
- Dry. Wood and paint should be dry throughout. If you have just painted or filled, let it cure fully.
- Sound. Tap along the paint. Anything that sounds hollow or lifts under a fingernail should be scraped back and made good.
- Smooth. Sand rough patches, fill dents and sand again. Gloss paint should be scuffed lightly so the surface is uniform.
- Free of hardware. Remove strike plates, hinges where practical, door stops and any trim you can take off. Covering around hardware always looks better than cutting tight to it.
- Dust-free right before application. Wipe again immediately before laying film.
On porous or uneven surfaces, a primer helps give the adhesive a consistent base. Check the product guidance for your finish and surface, and test a small hidden area first.
How to wrap a door jamb step by step
The sequence below suits a standard interior door with a three-sided jamb. Work calmly, and aim for long, uninterrupted pieces rather than many short joins.
1. Measure and plan the seams
Measure each jamb face and the depth of the return (the part that runs from the wall to the door stop). Add a few inches of extra on each end. Decide where seams will fall: the best place is where the head jamb meets the sides, because a corner joint is the least visible spot on a frame.
2. Cut your pieces
Cut the head jamb first, then each side. Use the same grain direction logic described above. Number the back of each piece lightly so you do not mix them up.
3. Clean and prime
Wipe the surfaces, apply primer if needed and allow it to dry as directed. Mask the adjacent wall and floor.
4. Apply the head jamb
Peel back a short section of backing, position the film and tack it down at one end. Our film is built with air channels in the adhesive, so the squeegee pushes trapped air out along the channels rather than leaving bubbles. Work from the center outward with overlapping strokes, peeling the backing as you go.
5. Apply the side jambs
Start at the top and work down. Press the film into the inside corners with the edge of the squeegee so it follows the shape instead of bridging it. Because Bodaq film is stretchable, it can be gently coaxed over a slightly uneven profile, but avoid overstretching, which can thin the film and distort the grain pattern.
6. Handle the corners
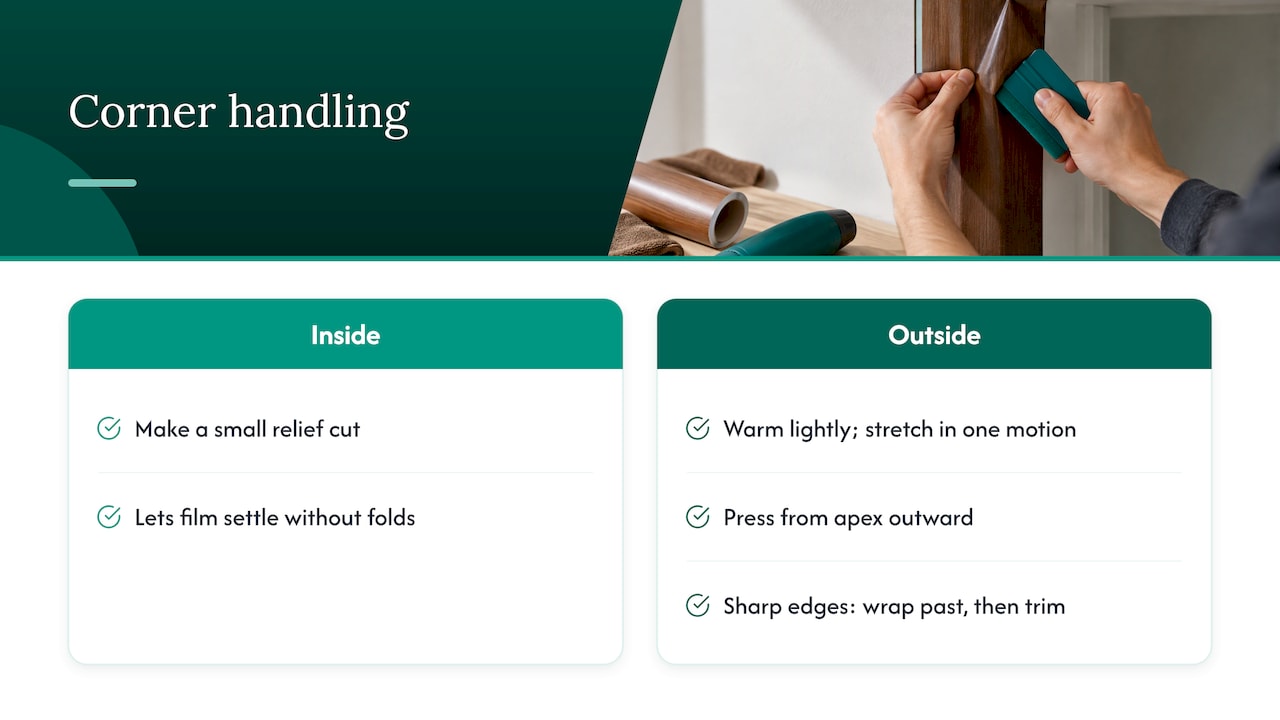
Inside corners: relieve the film with a small cut so it can settle into the corner without a fold. Outside corners: warm the film lightly and stretch it around the corner in one motion, then press it down from the apex outward. If the corner is sharp and hard-wearing, let the film wrap past the edge by a small margin and trim cleanly rather than ending it exactly on the apex.
7. Trim and tuck the edges
Where the jamb meets the wall or casing, a light, neat tuck is better than a flush cut with a visible gap. Use a fresh blade and a straightedge, and cut in one pass. Leave no frayed edge, because a rough edge is where lifting starts.
8. Post-heat and check
After the film is fully pressed down, apply heat evenly to the corners and edges as directed in the product guidance, pressing again as it cools. Then inspect every edge. Anything that wants to lift now will lift later.
Safe working matters on site: ladders, heat and sharp blades are involved, and we cover good practice in interior film installation safety.
Common mistakes and how to avoid them
- Skipping repairs. Film follows the surface beneath it. Dents and open joints will show.
- Overstretching at corners. This distorts the pattern and creates tension that tries to pull the film back.
- Cutting against the frame with the blade pressed hard. You may mark the wood or the wall. Use light passes.
- Placing seams in high-view spots. Hide them at corners or behind door hardware.
- Rushing the cleaning step. Most failures begin with oils or dust on the surface.
- Forgetting the hinge side. The return behind the hinges is the part people see every time the door opens.
Durability, cleaning and upkeep
Door frames take small, frequent hits: shoulders, bags, carts, vacuum cleaners and door stops. A film designed for interiors is built for that kind of everyday wear, and our own claims are about durability in high-traffic environments. For a realistic picture of what lasts and what does not, see our guide to architectural film durability and the film properties overview.
A simple upkeep routine is enough:
- Dust with a soft, dry cloth.
- For marks, use a damp microfiber cloth with a mild, pH-neutral cleaner.
- Dry the surface, especially along seams and edges.
- Avoid abrasive pads and strong solvents, which can dull or mark any decorative surface.
In busy commercial settings, consider a door stop or a kick plate for the lower jamb so repeated impacts land on something replaceable.
What affects the cost of wrapping a door frame
Nobody can give an honest flat price for “a door frame” because the work varies. These are the factors that move a quote:
- Number of frames. Repeating a job across 40 guest-room doors is more efficient per frame than a one-off.
- Condition of the existing frames. Repair and prep time can outweigh the time spent applying the film.
- Profile. A flat jamb is quick. Deep casing, routed details and tight returns take more cutting and care.
- Finish. Wood grain with directional matching uses more material than a solid color.
- Working conditions. Occupied rooms, night shifts and restricted access change labor planning.
- Hardware removal and reinstallation. This can be a small part of the job or a significant one.
Automotive guidance suggests that wrapping into jambs on a vehicle can add noticeably to installation time, according to one installer’s FAQ. That is a car figure and should not be carried over to an interior quote. For building work, ask your installer to price a sample frame, then multiply.
Our film is sold through quotation and order forms, and prices are not published as flat rates. Tell us the number of frames and the finish you have in mind and we will help you scope the material.
Our perspective on jamb wraps
We see door frames as the most overlooked surface in an interior. A beautifully finished door sitting in a tired, chipped frame undermines the whole room, and replacing millwork is slow, messy and expensive.
That is where film earns its place. Bodaq film is stretchable and self-adhesive, and its air-channeled adhesive is designed to make installation cleaner and easier, which matters on narrow runs where you cannot afford trapped air. With more than 450 textures and colors, you can match a door, extend a wall treatment or build a consistent signature across an entire property.
For hospitality teams and commercial managers, the real appeal is speed without disruption. Frames can be refinished in place, with less waste than a replacement, so rooms and corridors return to service sooner. For designers, it means the frame stops being an afterthought and becomes part of the composition.
Our advice: prepare thoroughly, plan your seams, choose a grain that follows the logic of real wood, and treat the frame as part of one continuous surface with the door.
Bodaq
Ready to wrap your frames?
Whether you are refreshing one hallway or a full floor of rooms, start with the finish. Browse the full film collections across wood, metal, stone and marble, solid colors and fabric and leather, then request samples to test against your door and lighting. If you want a surface-prep product to go with it, our water-based primer is in the catalog.

Contractors, installers and resellers can also look at how film opens new business opportunities, and general contractors can see how film benefits their projects. Designers will find ideas in our guide to film for designers, and homeowners can explore how to reinvent a home with architectural film.
FAQ
Should you wrap door jambs?
On interior doors, usually yes, as long as the frame is sound, clean and dry. It is an efficient way to match a frame to a wrapped door or to refresh a worn one. If the wood is rotted or wet, repair it first, because film is a finish and not a fix.
Is a door jamb wrap the same as a garage door jamb wrap?
No. A garage door jamb wrap is a metal or composite guard that protects exterior wood from pests and rot. An interior jamb wrap is a decorative architectural film applied to the frame of a room door.
How do you wrap a door frame so the corners look clean?
Plan seams at the head jamb corners, use relief cuts on inside corners and warm the film lightly to stretch it around outside corners. Press from the apex outward, trim with a fresh blade and check every edge after post-heating.
How much does it cost to wrap a door frame?
It depends on the number of frames, their condition, the profile, the finish and the working conditions. Car-wrap figures do not apply to interior frames. Share your project details with us and we can help you work out the material you need.
Can you wrap a painted door jamb?
Yes, when the paint is well bonded, clean, dry and smooth. Scrape and repair any peeling areas, scuff glossy paint lightly and use a primer where the surface calls for it.
Sources
- Window and Door Flashing: Code Requirements and Best Practices (ICC)
- Should You Wrap the Door Jambs? (CarWrappers)
- Should I wrap into door jambs? (Titan Vinyl Graphics)